Installing Fakoli on Windows
For the purposes of this tutorial we are going to assume that you are installing to a Windows 7 or Windows Server 2008 OS or later. While it is possible to install Fakoli on earlier Windows versions using either IIS 6 or Apache, the recommended installation environment is to use IIS 7 or later.
Step 1 - Enable IIS (if not already enabled)
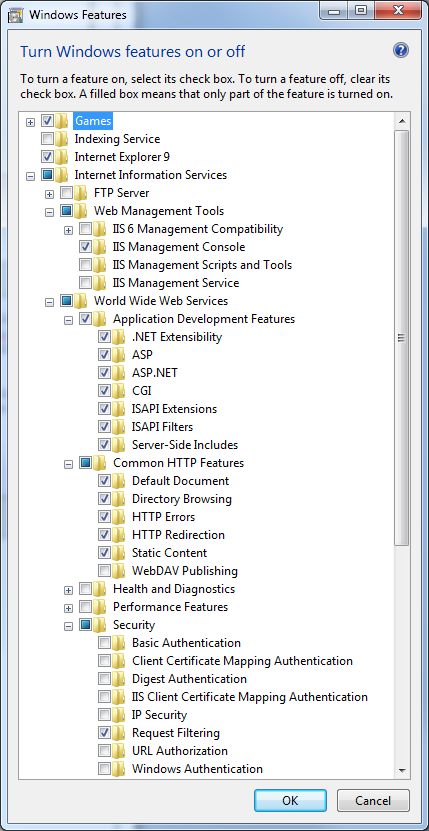
If you don't already have IIS installed, open the Start menu and click on Control Panel then Programs and Features. When the program list appears, click on Turn Windows Features on or off, then select the options as shown in the image below and click OK.
Step 2 - Install PHP 7
I find the easiest way to install PHP on a Windows machine is to use the prebuilt non-thread-safe binaries available from http://windows.php.net/download/. Pick the latest version that you feel comfortable with and download it. For simplicity of management and in the name of keeping include_path declarations short, I usually extract the PHP installation zip to a folder in the top level of my C: with a name indicating the version number of the release (C:\php7.0.26, for instance). This helps me test new versions of PHP for compatibility without having to remove the old versions.
Please note that while I am sure it is possible to configure Fakoli applications to work with PHP as installed via the Microsoft Web Platform Installer I have never actually managed to get this working properly myself, hence the recommended approach above.
Step 3 - Install Wincache
Wincache is the equivalent for APC on the Windows platform. You can download it from http://www.iis.net/downloads/microsoft/wincache-extension. Use the tiny 'additional downloads' link rather than the big green button - that'll just send you to Microsoft Web Platform Installer. Be sure to install the correct version that matches your version of PHP. The download comes with installation instructions.
Step 4 - Install URL Rewrite
If you don't already have it installed, download and install the excellent IIS URL Rewrite 2.0 package from http://www.iis.net/downloads/microsoft/url-rewrite. This provides the URL rewriting functionality required for Fakoli's friendly URLs.
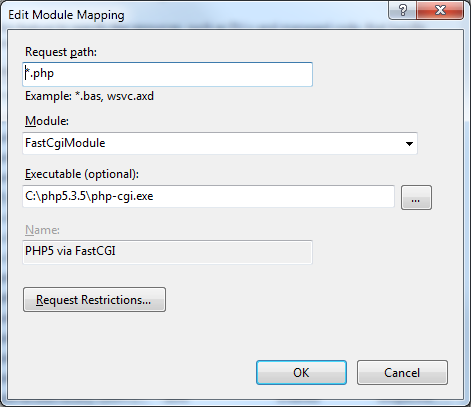
Step 5 - Configure a FastCGI Handler for PHP
The next step is to define a FastCGI handler mapping for PHP if you haven't already created one. Open the IIS Manager application and click on the Handler Mappings icon as shown below.

Click on Add Module Mapping from the Actions menu on the right and configure the Module Mapping as shown in the dialog below.
Step 6 - Install MySQL 5.5 or later
If you don't have a MySQL server set up on your machine, go to http://www.mysql.com/downloads/mysql/ and download the current Community edition of MySQL. While you are there you might also want to download MySQL Workbench to help you manage your database.
When installing MySQL server, be sure to install it as a service, and have the paths added to the system PATH variable.
Step 7 - Install Fakoli Library Files
First you will need to decide where your web related files are going to live. For development purposes I usually place all my projects in folders under my main development folder - C:\code. For production windows servers, C:\inetpub\ is a good choce. I will be using C:\code in this tutorial.
Next, unpack the Fakoli library into a sub-directory within this directory using one of the two following methods:
1) Install Via Subversion
Can check out Fakoli into your C:\code folder using TortoiseSVN (or your favorite SVN client).
You can check out the current latest version from our Sourceforge repository:
https://svn.code.sf.net/p/fakoli/code/trunk
You will want to check the Fakoli code out into it's own subfolder, so the target should be C:\code\fakoli. The above is the command for the main trunk build. You can also can check out specific versioned builds by tag.
2) Install from ZIP
You can download the latest Fakoli code in ZIP format from http://sourceforge.net/projects/fakoli/files/Stable%20Release/
Unzip the contents into C:\code\fakoli
Step 8 - Create a directory for Third Party libraries (optional)
Create a folder at C:\code\phplibs. You can then install any third-party libraries you need under this folder.
Step 9 - Update the include_path in php.ini
Next you will need to update the include_path variable in your php.ini file. The php.ini file should be in the root directory of your PHP installation. Edit the file using notepad (or your favorite editor) and change the include_path line to:
include_path = ".;c:/code/fakoli;c:/code/phplibs"
Step 10 - Create a blank Fakoli Web Site from Skeleton files
To get your project started, you will need the files that will live in your web root. The easiest way to install these is from the zip file at
https://downloads.sourceforge.net/project/fakoli/Web Site Skeleton/fakoli_web_files.zip
Unzip the files into your project directory C:\code\project_name (Where project_name is a placeholder for your actual project name). The skeleton files provide the default layout for a Fakoli application. The two configuration files that set up the Fakoli instance are include\config.inc and include\connection.inc.
Step 11 - Create a writable Document Upload area and a Logging area
Uploaded documents are stored outside of the web root of your application, to allow Fakoli's download scripts to provide role-based permissions to documents and images. To support this you will need to create an uploads folder (usually C:\uploads) and then a specific sub-folder in this area for your project (C:\uploads\project name). Both these folders need to be made writable by the user that the IIS process runs under. For development machines it is easiest to just set the uploads directory and subdirectories to be globally writable.
You will also need to create a writable folder for logging output. I usually use C:\logs as this folder.
Step 12 - Create an empty database schema instance
If you have MySQL Workbench installed, use that tool to create a new empty schema for your application, and configure a user to have access to it. If you don't have MySQL Workbench, or you prefer to use the command line, you can do the following:
First log into MySQL using your root account.
mysql -u root -p
You will be prompted for the root password - note that this is the MySQL root password, not the password for your root user (these should always be different). Once you are logged in, issue the following commands:
create database fakoli;
grant all on fakoli.* to fakoli@localhost identified by 'abc123';
quit;
Note - the database schema, user and password do not have to be called fakoli and abc123. This is just an example setup.
Step 13 - Create an alias in your hosts file
For local development you will need to add an entry into your hosts file so that IIS can serve your Fakoli site under that name. To do this you will need elevated privileges (even if you are logged in as a user in the Administrator group). Find the icon for your text editor, right click and select "Run as Administrator". Then open the file c:\windows\system32\drivers\etc\hosts and add a line like this:
127.0.0.1 project_name
Then save the file.
Step 14 - Configure the Fakoli site's include files
There are two main files within your Fakoli application's web directory that contain all the configuration information the application will need to operate. Those files are in the include sub-folder and are called config.inc and connection.inc.
Edit config.inc
First, issue the following command to go to the configuration directory:
cd /srv/www/vhosts/fakoli.mydomain.com/include
(Where fakoli.mydomain.com is replaced with the name of your site). Now edit the config.inc file in your favorite editor. It will initially look something like this:
<?php
/**
 * Application configuration variables.
 */
$config = array(

    "sitename"      => "%{SITENAME}",
    "homedir"       => "%{HOMEDIR}",
    "uploadbase"    => "%{UPLOADBASE}",
    "uploaddir"     => "documents", 		/* Directory for uploads */
    "email_from"    => "%{EMAIL_FROM}", 	/* From address for generated emails */
    "http_host"	    => "%{HTTP_HOST}",		/* URL for this server */

    "email_contact" => "%{EMAIL_CONTACT}", 	/* Email Address for contact */
    "email_name"    => "%{EMAIL_NAME}", 	/* Name of contact */

    "trace_path"    => "%{TRACE_PATH}",		/* File path to trace output log */
    "trace_level"   => 3,			/* Debugging trace level (0-5) */
    "trace_detail"  => TraceDetailHigh,		/* Detail level for trace output */

    // Application specific settings - migrate to ApplicationSettings?
    "enable_user_login"		=>	true,
    "thumbnail_size"		=>	75,
    "prettyURLs"		=>	true,
    "admin_SSL"			=>	false
);

$auto_form_defaults = array(

	"labelCSS"	=> "label",
	"buttonCSS"	=> "button",
	"componentPath"	=> "/fakoli"
);


require_once realpath(dirname(__FILE__))."/connection.inc";
require_once realpath(dirname(__FILE__))."/defaults.inc";
require_once "framework/functions.inc";

/**
 * Pull out a simple reference to the request method
 */
$method = $_SERVER["REQUEST_METHOD"];
?>
You can see all the fields you need to update are nicely picked out for you with %{}. It's almost like someone was in the middle of writing an installer, right? All you have to do is replace those paths with the paths to the folders we set up during our previous steps. The application name should be unique for the server, but is otherwise unimportant. Once we have updated all the values, the file should look something like this:
<?php
/**
 * Application configuration variables.
 */
$config = array(

    "sitename"      => "My New Fakoli Site",
    "homedir"       => "C:/code/fakoli.mydomain.com",
    "uploadbase"    => "C:/uploads/fakoli.mydomain.com",
    "uploaddir"     => "documents", 		/* Directory for uploads */
    "email_from"    => "me@mydomain.com", 	/* From address for generated emails */
    "http_host"	    => "fakoli.mydomain.com", /* URL for this server */

    "email_contact" => "me@mydomain.com", 	/* Email Address for contact */
    "email_name"    => "Webmaster", 	/* Name of contact */

    "trace_path"    => "C:/logs",		/* File path to trace output log */
    "trace_level"   => 3,			/* Debugging trace level (0-5) */
    "trace_detail"  => TraceDetailHigh,		/* Detail level for trace output */

    // Application specific settings - migrate to ApplicationSettings?
    "enable_user_login"		=>	true,
    "thumbnail_size"		=>	75,
    "prettyURLs"		=>	true,
    "admin_SSL"			=>	false
);

$auto_form_defaults = array(

	"labelCSS"	=> "label",
	"buttonCSS"	=> "button",
	"componentPath"	=> "/fakoli"
);


require_once realpath(dirname(__FILE__))."/connection.inc";
require_once realpath(dirname(__FILE__))."/defaults.inc";
require_once "framework/functions.inc";

/**
 * Pull out a simple reference to the request method
 */
$method = $_SERVER["REQUEST_METHOD"];
?>
Edit connection.inc
The connection.inc file contains the Database connection URL. Edit that and replace the parameters with the details of the database schema and user created in step 12. It should look something like this when done:
<?php

require_once "framework/connection_manager.inc";

ConnectionManager::$dsn = "mysql:dbname=fakoli;host=localhost";
ConnectionManager::$user = "fakoli";
ConnectionManager::$password = "abc123";

?>
Step 15 - Create the Web Site in IIS Manager
The last step in the configuration is to tell IIS where the site is to be served from. Open IIS Manager, select Sites in the left-hand tree, right-click and select Add Website.
In the Add Website dialog, add your project name, browse to your projects root directory, and then set the Host Name as your project name. Click OK to create your website.
Your Fakoli site should now be good to go. Open a browser and navigate to http://project_name/ and after a couple of seconds you should see the welcome screen. The MySQL database schema should have been automatically populated with all the tables for the components in your Fakoli configuration.
Installing Fakoli on OSX » « Installing Fakoli on Linux