Chapter 6. Automated Web Forms
One of Fakoli's most powerful features for Rapid Application Development is the AutoForm class. This class provides the ability to automatically generate web forms based on your data model classes. The forms generated in this way are automatically validated at both the client and server side, and can be extended and customised in a number of ways. AutoForm renders each of the data model fields according to its type, validates the data entry, and saves the data back to the database. The example below shows how a web form can be constructed:
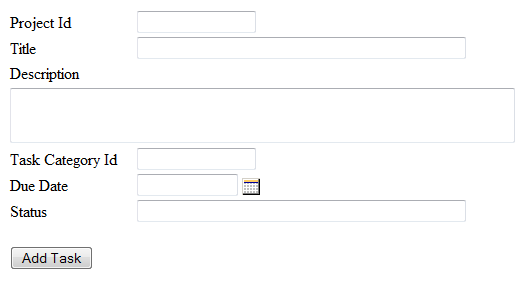
$task_id = checkNumeric($_GET['task_id']);
$task = new Task($task_id);
$form = new AutoForm($task);

$script .= $form->writeScript();
$form->drawForm();
This example will display a web form as follows:
Handling the submission of the form is also a simple task for your code. With the AutoForm working in its default mode as shown above, we would simply expand out the code sample above as follows:
$task_id = checkNumeric($_GET['task_id']);
$task = new Task($task_id);
$form = new AutoForm($task);

if ($method == "POST")
{
    if ($form->save())
    {
        redirect("success.php");
    }
}

$script .= $form->writeScript();
$form->drawForm();
The save() method on the AutoForm object handles all the work of persisting the updated object to the database, and returns true if there were no errors. If an error occurred (such as a server-side validation exception on the form data) then this error gets displayed as part of the form output for display to the user. We will discuss the AutoForm's validation features below.
This form gets us 80% of the way to a finished project. For the final 20%, we will employ AutoForm customization options.
Field Renderers
Fakoli field renderers provide handling of the data model's data types. Some field renderers, such as the DateFieldRenderer and the PasswordFieldRenderer, are called by default when the data model specifies a field as being of type "Date" or "Password", respectively. A list of these field renderers is shown in the table in Chapter 1. Other field renderers, such as the SelectFieldRenderer, which renders a list in a drop down, can be set in the calling script to override the default. Fakoli provides the following additional field renderers:
| Field Renderer | Use for Database Types | AutoForm handles as |
|---|---|---|
| Checklist | VARCHAR, TEXT | Checklist of options (an array) defined in the script or an include file, such as the data model. The user can select more than one. Data is stored as comma-delimited text. |
| Cross Reference Select | VARCHAR, TEXT | Checklist of options retrieved from a specified table. The user can select more than one. Data is stored as comma-delimited text. |
| File Upload | VARCHAR, TEXT | Input field with Browse button. The user can input a path or browse for the file. |
| Radio Button | INTEGER, TINYINT, VARCHAR | Radio button list of options of which the user can select at most one. |
| Rating | INTEGER, TINYINT, VARCHAR | Horizontally-aligned radio buttons with starting and ending labels to indicate low and high. User can select one. |
| Related Image Select | VARCHAR, TEXT | Drop-down list of images retrieved from a specified table. |
| Related Item Radio Button | INTEGER, TINYINT | Radio-button list of options retrieved from a specified table. |
| Related Item Select | INTEGER, TINYINT | Drop-down list of options retrieved from a specified table. |
| Select | INTEGER, TINYINT, VARCHAR | Drop-down list of options provided to the renderer; an array declared in the calling script or include file. |
| Select View Source | INTEGER, TINYINT, VARCHAR | Drop-down list of options provided to the renderer with a button to the right of the drop-down that enables the user to view the selected item through a popup window. |
| Tree Select | INTEGER, TINYINT | Tree control of options provided by the calling script. The tree can be set to single or multiselect. |
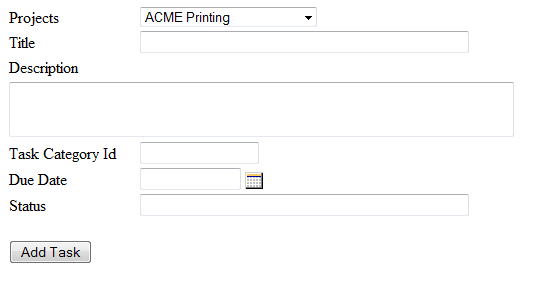
In our previous form project_id is rendered as a numeric input field but we would prefer to display a drop down listing the existing project names retrieved from the database. AutoForm enables customization of the form with several alternative field renderers. For the project_id field, we will set the form to render the project_id field using the RelatedItemSelectFieldRenderer as follows:
$projectRenderer = new RelatedItemSelectFieldRenderer($form, "project_id", "Project", Project, "ORDER BY project_name", "project_name", "project_id");
The above statement sets the form to render the field project_id with the project name fields retrieved from the Project data model object, ordered by the name field. The revised form display is shown below:
Other Customization Options
In addition to these optional Field Renderers, Fakoli's AutoForm class provides a set of variables and methods for customizing a web form. A few of the most commonly used features are described below:
- allowDelete: This boolean flag specifies whether the record shown in the form can be deleted.
- onDelete: script-defined callback function to be called when the record is deleted. The script can implement alternate delete behavior using this callback (such as setting a flag, deleting children, etc.)
- alias(): This method overrides the default label for a field when it is displayed in the form.
- annotate(): Supplies instructions or other information to display alongside a field.
- hide(): Call this to specify a list of fields to be hidden from the user.
- readonly(): Used to specify a list of fields that are displayed, but are not editable.
- onSaveComplete: script-defined callback function to be called after the record is saved.
- submitLabel: "Save" button label to override the default.
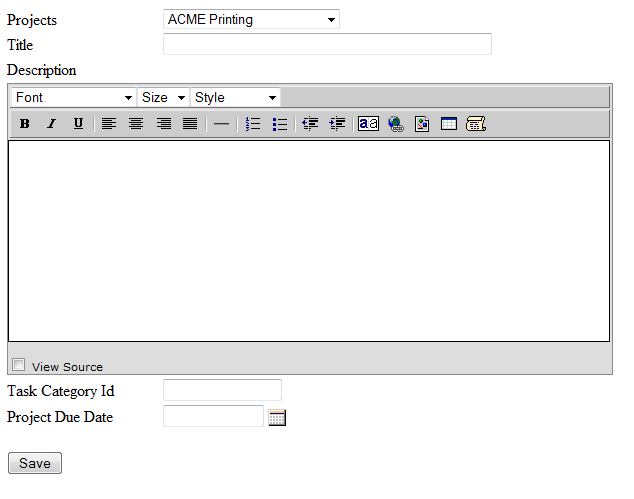
Suppose in our Task example, we wish to make the following changes:
- label the "Due Date" field as "Project Due Date"
- hide the "Status" field
- change the submit label to "Save"
- change "description" field from a text field to an HTML editor
We would add the following lines of code to our call script:
$form->alias("due_date", "Project Due Date");
$form->hide("status");
$form->submitLabel = "Save";
echo $form->writeScript();
The call to writeScript() above outputs any JavaScript needed for the display of the form and its fields. This script could also be output from a template file that also handles including JavaScript and css files and any modules you wish to include on your page (for instance, if you are using the Fakoli CMS, you would append this output to the $script variable).
To render the description field as an HTML editor, we change the fields array in the task data model as follows:
"description" => HTML,
The result is shown below:
Automatic Validation
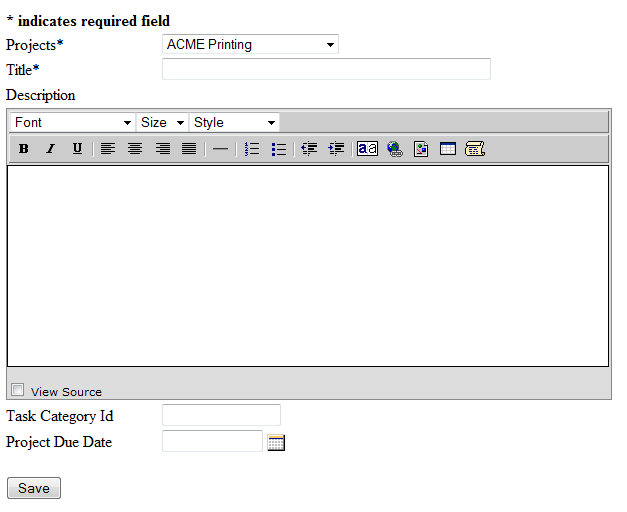
The AutoForm class also handles field validation prior to saving. The most common type of validation is whether a field is required, meaning the user enters a value. If in the above example, we wanted to make the fields "project_id" and "title" required, we would specify the following in the calling script:
$form->required("project_id", "title");
The resulting web form is shown below:
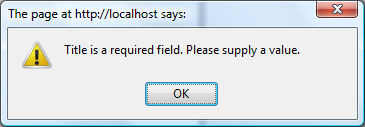
If the user clicks Save without entering a value in either required field, a popup message is displayed and the form will not save:
The AutoForm validation engine performs validation both at the client side using JavaScript, and at the server side. This ensures that having JavaScript disabled on the browser does not sidestep the form validation. In addition to the required() method AutoForm provides the following validation methods:
- range(): validates that a field's value is within the specified range.
- match(): validates that the value in one field matches the value in another field (useful for "Confirm" fields).
- password(): like match() but with specific rules for submitting the form without changing the password.
- unique(): validates that a field's value does not already exist in the database. Useful for ensuring unique usernames and other identifiers.
- regexp(): validates that a field's value matches the specified regular expression. This can be used to validate formatted text, such as phone numbers or email addresses.
Additionally some data types (such as Date and Time) will automatically register validators with the AutoForm to ensure that they are submitting valid data. If you come across a situation that requires special treatment it is also possible to add your own custom Validator objects to the AutoForm's validation pipeline. We will discuss this in the advanced topics section later in this tutorial.
Saving the Web Form
The code we've written so far displays the form properly but we need to add a few more lines to call AutoForm's save function. The following code specifies that we want to save using "POST" and if save is successful, redirect to the task list page. This code should appear just above the call to writeScript().
if ($method == "POST")
{
	if ($form->save())
	{
		redirect("task_list.php");
	}
}
Loading Data into the Form
Data that we have saved to the database must also be retrievable into the form. The task_list.php page would list all the tasks with a link to the task_form.php page, sending the task_id to the page which might be done with an HTML "a" tag as follows:
{$task->title}
When the user clicks on a link, the task form must retrieve the data from the existing task record. To do this, we add call the DataItem::load() function to load the task_id passed into the script:
$task_id = checkNumeric($_GET['task_id']);
$task = new Task();

if($task_id)
	$task->load($task_id);
Chapter 7. Search Forms » « Chapter 5: Working with Joins